Section 2: Media and Knives
2A Label and Roll Specifications
Two types of media can be used.
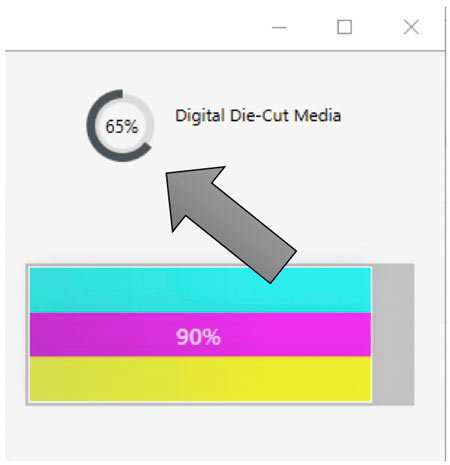
1. Digital Die-Cut Labels. If you are using the Printer to digitally die-cut your own shapes and sizes only Primera label stock can be used. This media comes from Primera with a smart chip that identifies the media, tracks the percentage remaining and automatically sets the sensor type to continuous. You will know it is installed when you see the Digital Die-cut Media percentage in the upper right corner of PrintHub. If you do not see this indication, the digital die cutter will not be enabled and you will not be able to cut shapes.
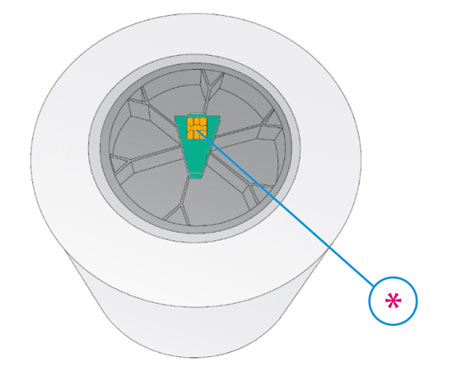
*Smart Chip
Primera offers laser marking media from Schreiner which is a black media with a yellow liner. Text and graphics appear white when the media is marked.
Other media cannot be used even if you take the chip from new/old Primera media for the following reasons:
- Old chips cannot be reused once they reach 0% remaining.
- Other media has liner that may be too thin. Liner on Primera media is specially created for our Printer to prevent cut through to the wear strip.
- Other media is not compatible with this laser marking system and either will not be marked or will produce smoke/fumes when marked.
2. Pre Die-Cut Labels. Pre die-cut sized label stock can be used in the Printer. This media has the shape already cut on the roll before you load it into the Printer. Refer to the Smart Chip 18 specifications and settings in the following sections before ordering custom stock from other companies.
Important!
- Catalyst can only be used with phase change laser marking label stock manufactured or approved by Primera. This Printer will not work with media that produces smoke/fumes/etc that will obscure the laser. There is no integrated filtration system to clear the smoke.
Label Sensing Methods
AMethod 1: Label Gap Sensing
BMethod 2: Through-Hole Sensing
CMethod 3: Reflective/Black Mark Sensing (Black Mark must be printed on back side of label stock)
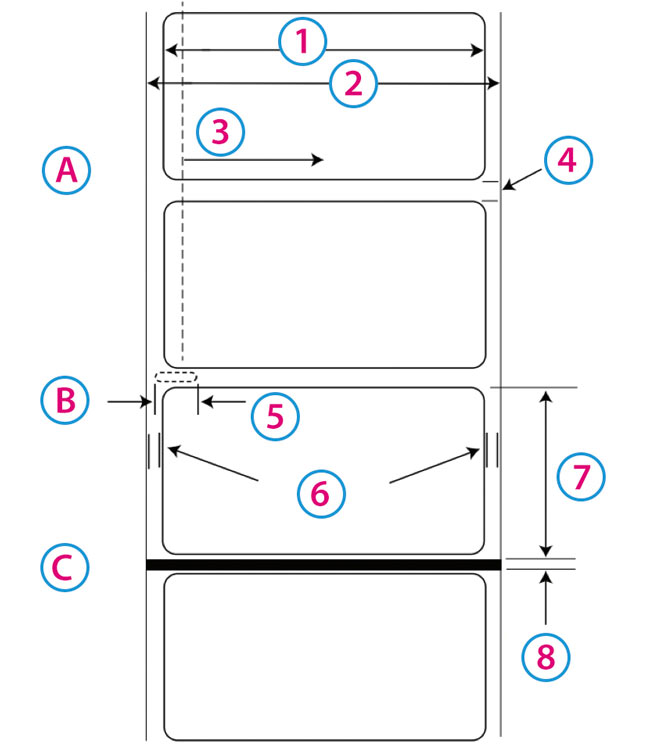
1Label Width
2Liner Width
3Gap Sensor Adjustment Range
4Gap Between Labels
5Width of Opening
6Distance from edge of Media to edge of Label
7Label Height
8Black Mark Width
Note: See table below for Max and Min values in inches and mm.
| Max | Min | ||
|---|---|---|---|
| Label width | 127 mm (5”) | 13 mm (0.5”) | |
| Liner/media width | 130.17 mm (5.125”) | 54 mm (2.125”) | |
| Label height/length | 305 mm (12”) | 13 mm (0.5”) | |
| Gap between labels | 253 mm (10”) | 2.5 mm (0.10”) | |
| Width of through-hole | 12.65 mm (0.5”) | 6.325 mm (0.25”) | |
| Gap Sensor Adjustment Range (from right edge) | 52 mm (2.05”) | 10.16 mm (0.40”) | |
| Reflective/Black Mark Width* | N/A | 2.54 mm (0.1”) | |
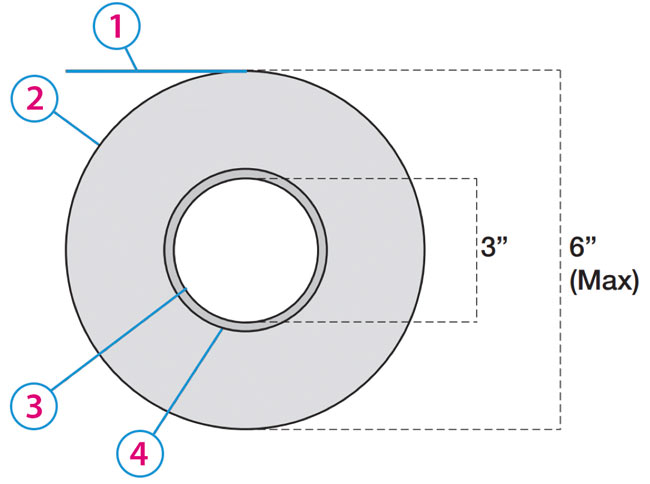
| Max Outer Diameter (OD) | 152.4 mm (6.0”) | N/A | |
| Inner Core Diameter (ID) | 76.2 mm (3.0”) | 76.2 mm (3.0”) | |
| Recommended Total Thickness(Liner + Label)** | 10 mil (.0010”) | ||
| Distance from edge of media to edge of label | Printer assumes 2mm (1/16”) gap. However, this is adjustable via the left margin offset. | ||
* The Reflective/Black Mark should be opaque to infrared light. The mark should be between the labels. The end of the mark should correspond with the beginning of the label.
** This is the recommended maximum. There are two factors that determine whether the Printer will accept any particular stock thickness.
- The ability for the printer to pull the paper through the print area.
- The ability for the sensor to read through the backing if the sensor is set to die-cut.
If you are printing in continuous or reflective label sensing mode number 2 does not apply. The fact that the Printer must read through the backing in die-cut mode will limit the thickness much more than the Printer's ability to pull the paper through the print area. However, if you adjust opacity level of the liner enough to allow the label to be seen by the stock sensor, the thickness will only be limited by the Printer's ability to pull it through the printer area. For these reasons the weight or thickness of the liner is a variable that cannot easily be defined. Primera recommends and uses 40# liner with all Pre Die-Cut label stock.
It is important to test all label stock with the intended Printer before ordering large quantities!
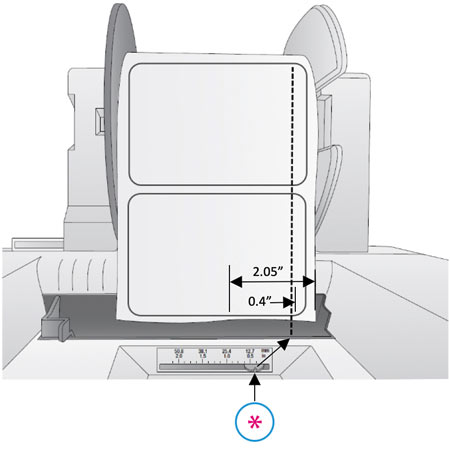
Gap Sensor Adjustment
12.05”
20.4”
3 Gap Sensor Position Indicator from right edge of
media. The position indicator corresponds to the ruler
NOT the
installed label stock.
Roll specifications:
Label Stock
1Label Side Out
2Roll O.D.
3Core I.D
4Core O.D.
Note on Label Orientation: If you are using an applicator to apply your labels, be sure to order label stock with the correct orientation for your applicator. For example, most applicators will apply the side of the label first, so you will want to print the labels sideways.
Digital Die Cut Media Notes: Even though the width of the media is 107.95 mm (4.25 inches), the drive rollers on either side prevent printing in the areas indicated. The knurled rollers that bite into the media to drive it, damage the printable surface in this area. The actual printable area is 107.95 mm (4.25 inches).
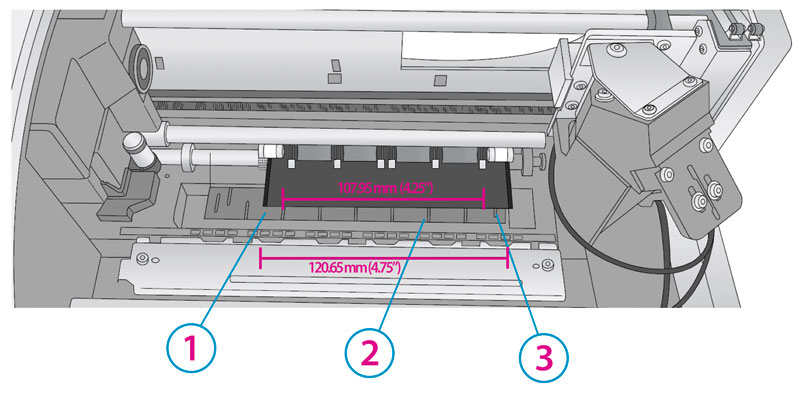
1Umprintable Area
2Printable Area
3Umprintable Area