1B Choosing a Good Location
- Place the Printer on a flat surface in a location with adequate air circulation to prevent internal heat buildup.
- Do not place the Printer near heat sources such as radiators or air ducts, or in a place subject to direct sun light, excessive dust, mechanical vibration or shock.
- Allow for adequate clearance in front of the Printer to accommodate the printed label stock as it is leaving the Printer to avoid the possibility of binding or jamming of the label stock.
- Allow for 6” of clearance behind the Printer to accommodate loop creation during cutting operations. The area directly behind the Printer must also not be obstructed by USB or power cables connected to the Printer.
- Allow for adequate overhead clearance for opening the top cover to allow easy access to the label stock. The Printer will require 7 inches (17.78 cm) of additional space on the top side to completely open the cover (Total = 16.5" or 41.91 cm).
1C Unpacking and Inspection
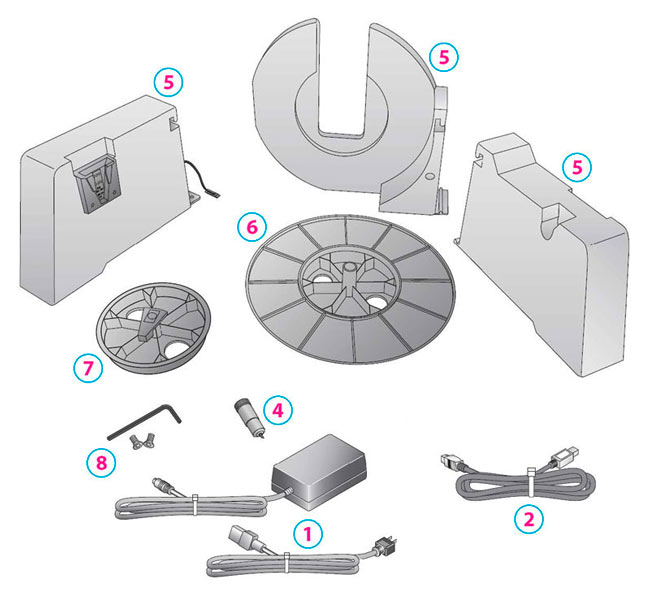
While unpacking your Printer, inspect the carton to ensure that no damage has occurred during shipping. Make sure that all supplied accessories are included with your unit. The following items are included in the supply box:
1Power Adapter and Cord
26’ USB Cable (If other USB cable is used, it must be 6’ (2 M) or less)
3Printed documentation
4Die Cutting Knife Holder with knife preinstalled
5Label roll holders (Assembly required – section 1C)
6Large Roll Hub
7Small Roll Hub
8T8 Allen Key and two screw