2G Adjusting the Gap Sensor Position (Pre Die-Cut Labels Only)
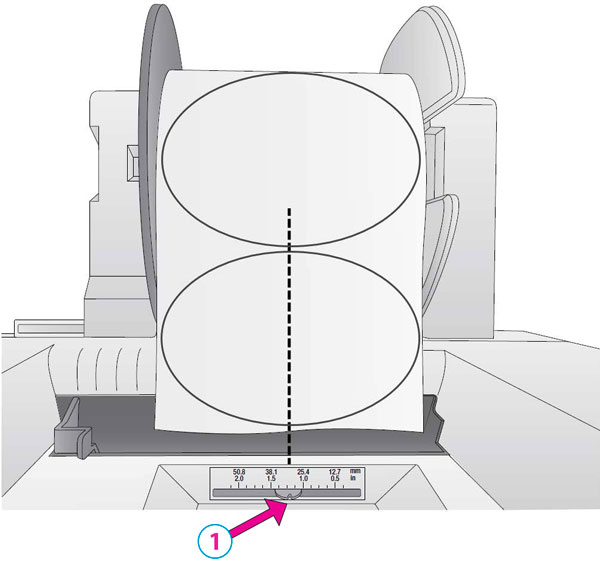
If you are using label stock other than standard square / rectangular die-cut labels such as circular die-cut labels or through-hole stock use the instructions below to adjust the position of the label stock gap sensor. The sensor can be adjusted using the slide bar on the back of the printer. Below the slide bar is a measurement which represents the distance between the edge of the label stock and the sensor. Measure the distance from the edge of the label stock to the correct position on the stock. Set the sensor so the side of the slide bar lines up to this measurement. See dashed line in the illustration below.
1Set as 2”
Important Note: You must adjust the stock sensor before loading nonstandard label stock.
Circular Labels
If you are using Circular Labels you must adjust the stock sensor to correspond with the very top of the label where the circles are closest together. If the sensor is too far to the right or the left the printer will still sense the label but the image may be offset downward because the printer will start printing at the wrong position. If you are using stock that has multiple labels across, make sure the sensor corresponds to a place on the stock that has a label and not a vertical gap
The sensor can only be moved a maximum of 2 inches from the left side of the printable area. This means that the maximum diameter circular label that can be printed is 4 inches. For circular labels larger than 4 inches in diameter, you must have a black mark printed on the back of the label stock. This means that you must change the Stock Sensor Mode to Reflective. The printer will now look for the black mark representing the beginning of the next label instead of the die-cut. For more information on changing the Stock Sensor Mode see section 3C.