6G Creating a Custom Page Size - Mac
In many programs such as Adobe Illustrator, Photoshop or Acrobat Reader you will need to choose your label/page size before you print. If the label size you need to use is not already on the list of available pages sizes you will need to create a new custom size on the print screen of the program you are using to print.
1. Click the Paper Size drop down menu. Choose Manage Custom Sizes.

2. Click the + to create a new size.
3. Enter the actual width and height of your label stock.
4. Set all margins to zero.
5. Rename the size the same as the width and height.
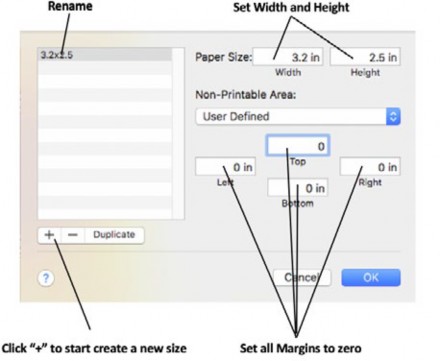
1Rename
2Set Width and Height
3Click "+" to start create a new size
4Set all margins to zero
6. Your custom size will now appear at the bottom of the preset size list in this application and any other application on this Mac.
Note: If you need to overbleed your image to achieve complete coverage of your label, you would use this process to create a custom size which is .03” (or less) larger than your actual label stock. For Example 4.03” x 3.03” for a 4” x 3” label.