3F PrintHub Settings
There are two areas with Settings in PrintHub.
General application settings that apply to the software and all printers can be found by clicking the blue “Settings” button in the lower left. Printer specific settings can be found on the “Printer Settings” Tab.
General settings
Language. Typically, the language is set to match the language setting in the operating system. However, you can override currency settings on the Language Tab.
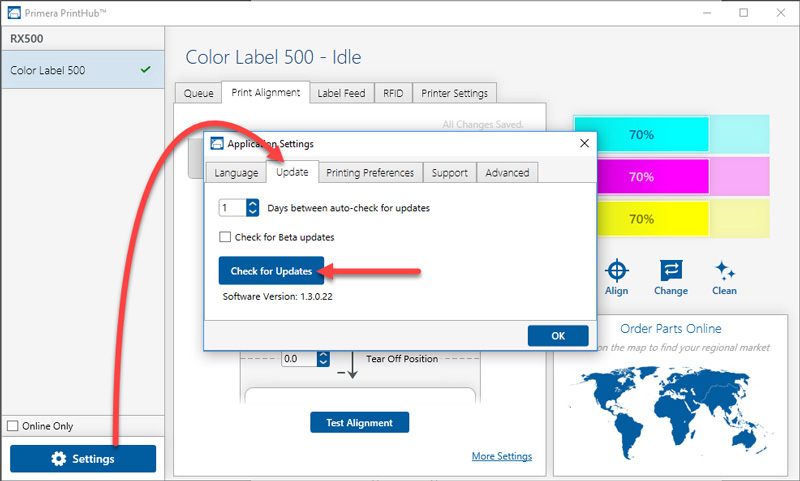
Automatic Updates. Automatic Updates will update PrintHub, the printer driver and the printer firmware. Every 7 days you will be prompted to update the software if there are any newer versions. You can choose to increase or decrease that automate check. You can also perform a check for updates immediately by clicking the “Check for Updates” button. Finally, if you would like to receive beta software check the “Check for Beta updates” box
Printer Settings
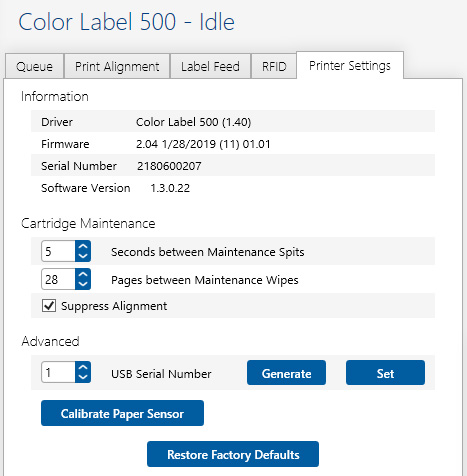
Information. This section displays all current driver, software and firmware versions.
Cartridge Maintenance. Here you can adjust the frequency of certain maintenance operations. Increasing the value of “Seconds between Maintenance Spits” will decrease ink usage but could also cause poor quality printing.
Increasing or Pages between Maintenance Wipes will speed up printing but could also cause poor quality printing. Check the Suppress Alignment message to prevent the window from appearing which prompts you to align the cartridge every time a new cartridge is installed. Skipping the alignment is faster but can result in poor print quality.
Advanced. You can install multiple printers to the same computer and use them simultaneously. To do so you will need to change the USB serial number identifier of one of the two printers, two of three printers, three of four printers etc. To change serial numbers:
- Connect each new printer one at a time. The current USB Serial Number will be displayed.
- Click Generate. It will find the next available USB Serial Number based on the currently connected printers. For the first one it should set it to 2 and for the next printer 3 and so on.
- Click Set. You will hear the printer reset and the settings window will turn gray. After it resets you will be able to see the settings window again. Keep the printer connected.
- Now you can connect the next printer. Windows will automatically install a new driver for that new printer and name it Color Label 500 (Copy 1). You can rename it later by editing the printer properties in the Windows printer list.
- You will now see a second printer appear in the left column – Color Label 500 (Copy 1). Click on it to display information about this printer. If this is the last printer, you will connect you are done. If you wish to connect additional printers follow through steps 2-4.
Calibrate Paper Sensor. Calibrate the paper sensor if you are receiving TOF errors. The calibration process will prompt you to remove all paper/stock from the printer before calibrating.
Restore Factory Defaults. This will set all Print alignment and other calibration settings back to factory defaults.