3F. ADVANCED PRINTER DRIVER SETTINGS (MAC)
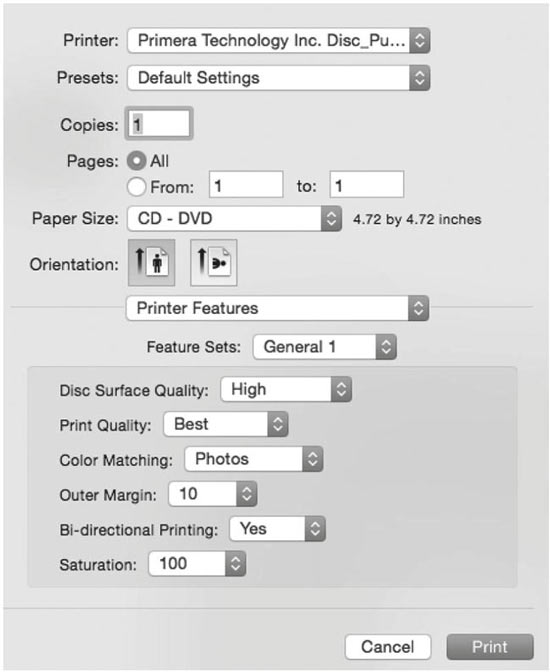
Access the advanced printer driver setting from any printing program on the Mac. Go to file - print. Select Printer Features from the Preview Dropdown menu to change settings. Click the Presets menu to save any changed settings for use in this or other programs.
Note: The most common settings can be accessed directly from the print step of PTPublisher. If you adjust settings there you do not need to adjust them here. These settings do not typically need to be changed. They are for advanced users only.
The following is a description of the printer driver settings:
Disc Surface Quality
This setting also affects the Quality of the printed image by altering the color matching profile. Start with the default setting for fastest printing and the least ink consumption. If the quality needs improvement, move to the next highest setting.
Print Quality
There are three options for image quality. Keep in mind that Normal provides the fastest print at lower quality while Best delivers the best quality at a slower print speed.
Color Matching
Graphic mode is best used for graphical images where accurate color reproduction is not as essential. Images printed in this mode will look more vibrant because more ink is being used to produce them. However, printing images of people may produce skin tones that have a reddish tint.
Photo mode is best used for photographic images where accurate color reproduction is very essential. Images printed in this mode will look lighter than those printed in Photo mode. Skin tones especially will look more natural in this mode.
NOTE: Exact color matching of the printed discs to the screen may never be possible since there are factors that affect this out of the driver's control. The surface of the disc reacts with the ink in the cartridge to produce the color. For this reason, when printing the same image to different brands of discs with different printable surfaces the printed output can look entirely different.
Outer Margin
The Outer Margin refers to where the printing will cut off around the outer edge of your disc. The size of the printable surface can vary from one type of media to the next. This setting allows you to set the outer margin in millimeters enabling you to print all the way to the edge regardless of the type of disc you are using.
Bi-directional Printing
Set this option to "Yes" for faster printing that requires cartridge alignment. Set it to "No" for slower printing that does not require cartridge alignment.
Saturation
This setting will control the amount of ink saturation on the disc. When printing onto the Primera TuffCoat discs, 96% is usually sufficient. When printing onto other brands of media, or if you Creating Discs 41 would like to print darker colors, you may wish to increase the Intensity setting.
Inner Diameter (Select General 2 from the Feature Sets menu to view this setting)
- 23mm for Primera's Tuff-Coat CDR
- 24.9mm for the Hockey Rink Disc, Business Card Disc and 80mm CD
The inner diameter refers to the size of the non-printed center on your disc. The size of the center hub can vary from one type of media to the next. This setting allows you to set the inner diameter in millimeters enabling you to print all the way to the center hub regardless of the type of disc you are using. For the discs that Primera sells, use the following guide for Inner Diameter:
Configuration Utility
This utility can be accessed via the printers area in system preferences. Click the apple in the upper left of your screen - choose system preferences - Select Printers and Scanners - Select the Primera Technology Disc Publisher SE-3 - Click the Options and Supplies button - click the Utility button - Click Open Printer Utility.
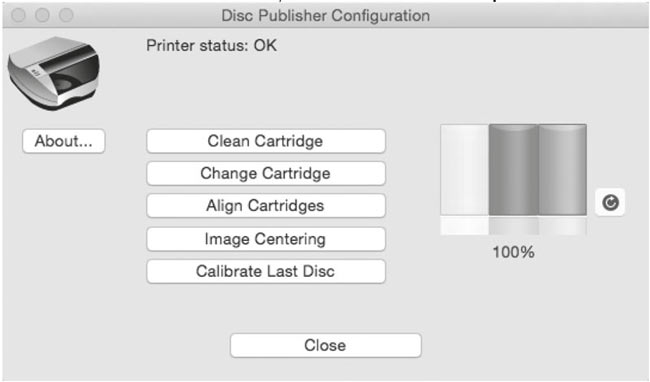
You will see the Color Ink Level is displayed. The Color Ink Level represents the lowest color in your cartridge. For instance, if your cartridge has 80% cyan 50% yellow and 65% magenta ink remaining, the level reported would be 50%. You will also see the following buttons:
Clean Cartridge
A cartridge that sits idle in the Publisher for a period of time may start to experience some drying of ink in the tiny nozzles that make up the print head. Clicking the Clean Cartridge button will cause the Publisher to pick a disc and place it into the printer tray. The Publisher will then print a simple pattern that will flush ink through the nozzles. The test pattern will also show you if any nozzles are clogged. In the pattern you will see some diagonal lines which should be continuous; breaks in those lines indicate a clogged nozzle. Please note that it may require more than one cleaning to fully clear all nozzles. If the nozzles are not fully clear after a few cleaning prints, it may be necessary to remove the cartridge and actually clean the print head by gently blotting the nozzles with a moist cloth or paper towel before replacing it in the Publisher. See Section 4-D.
Change Cartridge
If you need to change the cartridge, it is a good idea to use the Change Cartridge button in the Configuration Utility. This ensures the most accurate tracking of ink levels. To change a cartridge, click the Change Cartridge button. The cartridge holder will move to the center of the Publisher to make it easier to install the cartridge. Lift the top cover and install the cartridge as described in Section 2B of this manual. You will be prompted to let the system know whether or not you are installing a new or used color cartridge. Once installed, click the OK button and the system will update your cartridge levels.
Align Cartridges
The Cartridge Alignment prints a test print and then automatically scans the print to configure your printer for bidirectional printing. It is important to perform this calibration every time you change a cartridge. If you forget to perform this calibration you will be prompted to do so before your first print from the new cartridge.
Image Centering
The Image Alignment button will allow you to nudge the image up, down, left, or right on your disc. To center the image, click the Image Centering button. You will be
prompted with a choice to print a test print or simply enter values to nudge the image alignment on the disc. ![]() If you do not know the direction and distance to move the image in order to center it on your disc, you can opt to print the centering test print. Make sure the Publisher has discs and an ink cartridge installed, and it is connected and ready to receive a print job, and then click the Yes button. The Publisher will pick a disc
and print a scale of numbers on it. You will be
prompted to open the Publisher's front cover, rotate the
printed disc 180 degrees, reload it into the input, and
close the cover. Click OK when ready and the Publisher
will pick the disc and print another scale of numbers.
The disc should look like this:
If you do not know the direction and distance to move the image in order to center it on your disc, you can opt to print the centering test print. Make sure the Publisher has discs and an ink cartridge installed, and it is connected and ready to receive a print job, and then click the Yes button. The Publisher will pick a disc
and print a scale of numbers on it. You will be
prompted to open the Publisher's front cover, rotate the
printed disc 180 degrees, reload it into the input, and
close the cover. Click OK when ready and the Publisher
will pick the disc and print another scale of numbers.
The disc should look like this:

*Back
1NOTE: After printing this image once, rotate this CD so the ARROWS point to the BACK of the printer and print again.
2Vertical Calibration Find and enter the number whose lines tough (must be the SAME number)
3Horizontal Calibration Find and enter the number whose lines tough (must be the SAME number)
Once the print has finished, you will see the following dialog box:
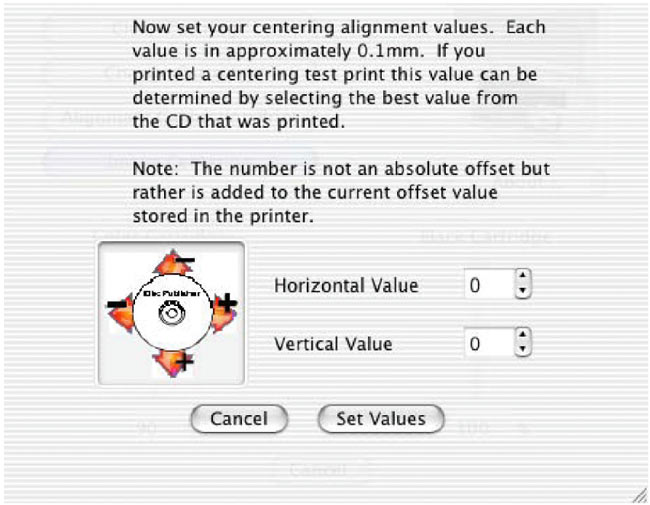
Look at the finished alignment disc and pick the numbers that come closest to lining up with one another. For instance, on the disc shown in this manual, the vertical alignment is 2 and the horizontal alignment is 0. Enter this in the alignment dialog box.
If you choose not to print the test print, you will simply see the alignment dialog box and can enter values to move the image. The unit of measure is roughly 0.1mm. Making the Horizontal Calibration number smaller or more negative will move the image slightly to the left. Making the Horizontal Calibration a larger value, or more positive will move the image to the right. If the Vertical Calibration number is made smaller, or more negative the image will move slightly up. If the Vertical Calibration is set to a larger value, or more positive value, the image will move down on the disc.
Calibrate Last Disc
Use this calibration if you frequently receive false messages that two discs were picked. When you press this button you will be prompted to place one disc in the input bin. The Publisher will then touch the disc with the robotic arm to set the correct measurement for the last disc in the bin.
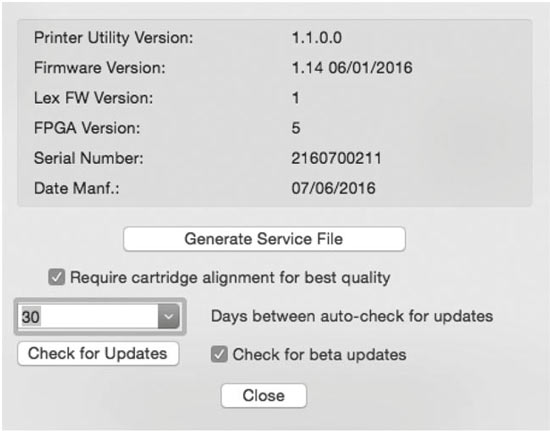
About Button
Click the About button to view the current firmware and driver version, find the serial number, Generate a service log file, and check for firmware and driver updates.
Finally, you may disable the print alignment requirement.
Note: If you do not align the cartridges, print quality may suffer.
3G. USING OTHER GRAPHICS PROGRAMS
While SureThing and Swift Publisher will handle most labeling needs, other graphics programs can be used if you prefer.
When printing and burning through the PTPublisher software your Publisher will support the following additional standard label image file formats: BMP, TIF, JPG, GIF, PNG and PRN. These formats can be exported from most any original graphics format such as Adobe Photoshop or Illustrator.
When creating images in other graphics programs we recommend creating a 120x120mm (4.72" x 4.72") square image that has a 300 dpi resolution.