Section 3: Creating Discs
There are two main components to creating discs, printing and burning. For PC, SureThing CD Labeler is used to design the image to print on the disc. For Mac, Swift Publisher is used to design the image to print on the disc. For Mac and PC, PTPublisher controls the recording and allows you to select the image to be printed to your discs.
3A. TUTORIAL: COPY A DISC (PRINT ONLY FOR AUTOPRINTER USERS)
Note: PTPublisher functions virtually the same on both Mac and PC. Every effort was made to make them look and function the same. However, due the unique benefits and limitations of both operating systems there are subtle differences. Where important, those differences will be highlighted. In general, these instructions will apply to both the Mac and PC editions.
Note for AutoPrinter Users: Start at step 4 after choosing Print Only from the project start window.
There are three basic steps to any project. 1. Add Data 2. Add a Print File. 3. Set the number of copies and adjust options (Summary). The instructions below explain how to do the most common project - A Copy Project.
A Copy Project can be used to copy any CD, DVD, DVD-DL or Blu-ray master. This job type reads the master disc from the Disc Publisher drive to the hard drive of your computer. The master is stored in the Global Image format (*.gi) in a temporary location on your computer. PTPublisher uses this temporary file to make all subsequent copies that are requested. The master disc is read only once to create the initial temporary file.
Recommended for: All CD, DVD or Blu-ray content or disc types (Audio CD, Data CD, Software Install Disc, Video CD, DVD Video, Blu-ray Video: CDR, DVD-R, DVD+R, DVD-ROM, DVD+DL, DVD-DL, BDR, BDR-DL, etc.). This is best used for single runs where you will not need to make additional copies of the master disc at a later time.
This project requires a master disc. If you do not have one use another project type. (See Section 3B)
- Select Copy Project from the Starter Window or the New Project Panel on the left side of the screen. Step one of the Copy Disc wizard will be displayed.
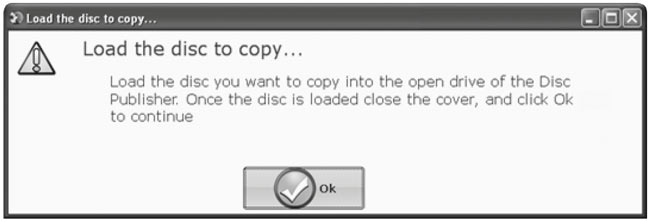
- You will be prompted to place the disc you would like to copy into the drive inside the Disc Publisher. The tray door will open automatically. Place the disc in the drive and click OK.
- The Publisher will close the drive and read the contents of the disc. It will display disc type (CD/DVD) and show the size of the disc in Megabytes. Verify this information is correct and click the next arrow to continue.
- Select the print label file by clicking the select a label button. When you have selected a print label file, click the next arrow. There are several ways to select a print file. See the explainations below for more information.
For any job type you choose you will be prompted to select a label file to print. You may select an existing label, create a label or choose to print nothing. Simply click the next arrow to print nothing on the disc. Otherwise follow the steps below.4a. Select a Label
- Click the browse button to open a browse window to choose your print file.
- Double Click on the file to add it to your project. You may add any BMP, JPG, TIFF, SureThing (PC) or Disc Cover (Mac) file. SureThing or Disc Cover files are automatically formatted correctly. All other file types should be 12 mm x 12 mm (4.72" x 4.72") square. For best print quality the image resolution should be at least 300 dpi.
4b. Create a Label
- Click the Create a Label button to open the SureThing CD Labeler or Disc Cover program. These programs will allow you to create a label.
- Follow the instructions in Section 3 D or E to create a label using SureThing or Disc Cover.
- Once you have designed the label, save it and close the program. A message will appear asking if you would like to use the label file you just created in your current project. Click Yes to use it in your project. Once you choose your label a preview will be displayed.
- After selecting your label to print it is important to check the Printer Settings. These settings are dependent upon the specific discs you are using. Each disc (media) brand or type has a different sized non printable outer margin or inner diameter. It also has a different printable surface.
For Primera TuffCoat branded discs simply choose your media from the drop down list, the settings will be adjusted accordingly.
Inner Diameter and Outer Margin (Printable Area). If you have other media, you may need to measure the unprintable outer margin and the inner diameter with a clear millimeter ruler to find the correct size to input here. For the outer margin, measure from the edge of the disc to the beginning of the white printable surface. For the inner diameter measure from one side of the unprintable hub to the other. The unprintable inner diameter will almost always be larger than the center hole of the discs (15mm).
Print Quality. All Primera media is automatically defaulted to the best print quality. Other media may also accept the best quality setting. However, with some media you may have to print at a lower print quality to eliminate smudging and bleeding. Some lower quality media cannot hold all of the ink that is printed at the highest quality settings.
Click the next arrow.
- The third and final step of any project is the summary screen. On this screen you can review the data and print selected for the project, set the number of copies, adjust burn options and name the job. Click the Options button to access burn speed and other options. If you do not adjust the project options, optimal settings will automatically be selected for you.
Click the "Go" button to start the job.
AutoPrinter users Start here after choosing Print Only from the Project Start Window.