2F. PRINTER UTILITIES AND COST ESTIMATOR
The printer utilities and the cost estimator can be accessed by double clicking the ink levels in the lower right corner of the screen or by clicking the Tools Menu - Printer Properties.
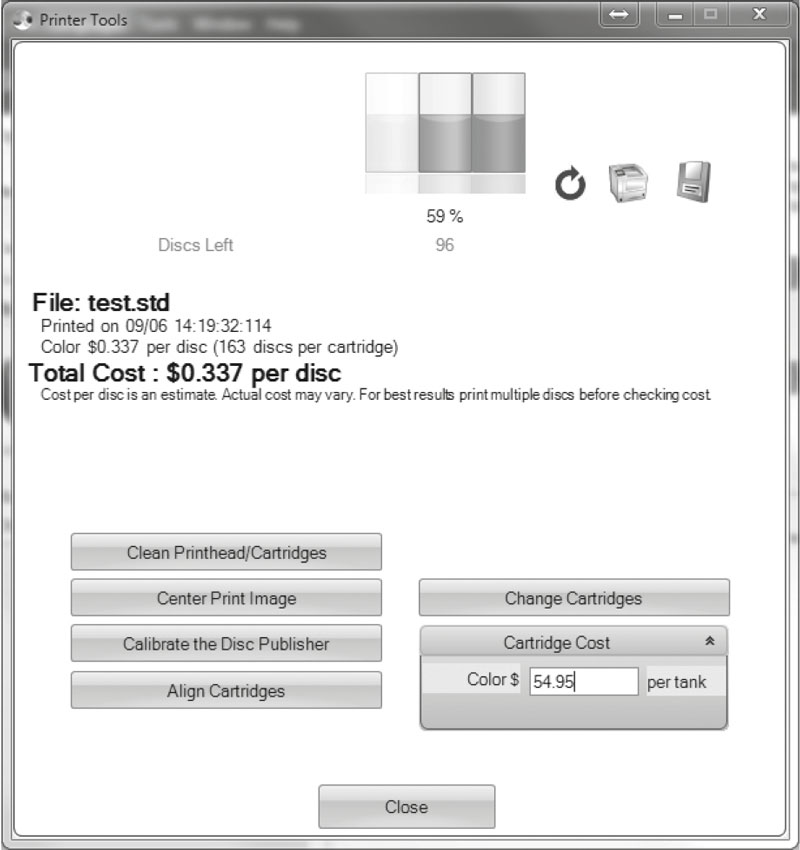
Cost Estimator
After printing one disc of any design the Cost Estimator can be used to estimate the cost per discs. Ink cost is automatically and continuously calculated based on the color cartridge costs entered. Only the last printed label cost is displayed. For reference, the print file and date of last print is displayed as well.
- You will need to Set the Cartridge Cost first before receiving a cost per disc. Adjust the cartridge costs according to the actual price paid. The estimate does not take currency into account so you can assume that whatever value you entered is displayed in your currency.
- Save a screen capture of the cost by clicking the disc icon.
- Print a screen capture of the cost by clicking the printer icon.
Important Note: The cost per disc represents the average cost per disc over an entire run of labels. This means that the per label cost will decrease and become more accurate as the number of labels printed increases. This is because the ink that is used for initial job starting cartridge maintenance is divided into a larger number of labels.
Calibrate the Disc Publisher
Several advanced calibrations can be performed with this utility. Under normal circumstances you would have no reason to perform any of the calibrations since all of them are factory calibrated. However, if the Disc Publisher is having trouble picking from any location, the calibrations available here can be used to correct this problem.
Align Cartridge
The Cartridge Alignment prints a test print and then automatically scans the print to configure your printer for bidirectional printing. It is important to perform this calibration every time you change a cartridge. If you forget to perform this calibration you will be prompted to do so before your first print from the new cartridge.
Center Print Image
NOTE: Your printer comes from the factory pre-calibrated to print the image to the center of the CD. You can use this adjustment if you need to fine-tune this location.
If you ever wish to verify your factory-calibrated Vertical and Horizontal calibration settings, you can run a simple calibration procedure to assure that your images will be centered when printed on a CD. To do this, refer to the following steps:
- Click Center Print Image in the Printer Settings Window.
- Click Start Auto Calibration to begin printing the calibration test print.
- When the print is complete, rotate disc 180º and put the disc back in the input bin and repeat step 2 using the same disc.
- When the second run of the print is complete, you should have a test print that looks similar to the following:
- Along the Vertical axis of the printed disc, find the number whose lines touch. For example, in the above illustration, Enter the number 2 into the Vertical box of the Calibration window and 0 for the Horizontal axis.
- Select the OK button. Your images should now be centered when printed on a disc.
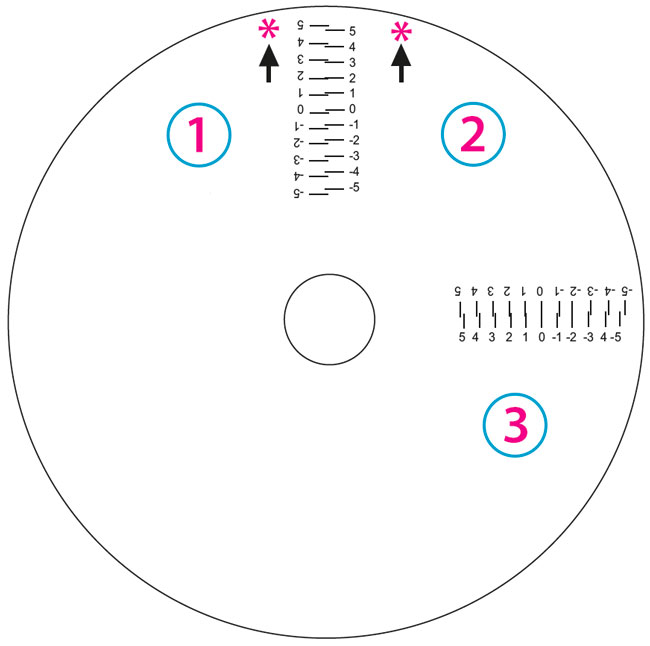
*Back
1NOTE: After printing this image once, rotate this CD so the ARROWS point to the BACK of the printer and print again.
2Vertical Calibration Find and enter the number whose lines tough (must be the SAME number)
3Horizontal Calibration Find and enter the number whose lines tough (must be the SAME number)
Note: If you think you know what values to enter for the horizontal and vertical fields you may skip the Auto Calibration and enter the values directly by clicking Manually Set Values.
Change Cartridge
Select the Change Cartridge button to install a new ink cartridge or to switch back and forth between previously used cartridges.
Clean Printhead/Cartridge
If the printer has been idle for a long period of time you may start to experience some drying of ink in the tiny nozzles that make up the print head. Clicking this button will cause the Publisher to pick a disc and place in into the printer tray. The Publisher will then print a simple pattern that will flush ink through the nozzles. Multiple cleaning prints may be necessary! If the nozzles are not fully clear after a few cleaning prints, it may be necessary to remove the cartridge and manually clean the print head. See Section 3D.
2G. LABEL DESIGN REQUIREMENTS FOR OTHER GRAPHICS PROGRAMS
Other graphics programs can be used to design labels and print directly to the Publisher.
When printing and burning through the PTPublisher software your Publisher will support the following additional stardard label image file formats: BMP, TIF, JPG, GIF, PNG and PRN. These formats can be exported from most original graphics formats such as Adobe Photoshop or Illustrator.
When creating images in other graphics programs we recommend creating a 120x120mm (4.72 x 4.72) square image that has a 300 dpi resolution.