B2. Steps to any Project
Step 1: Add Data
Depending on your job type this step will be different. You may choose your master, choose data on your hard drive, choose tracks to your audio CD, choose your disc image or DVD or BDR video folders.
On most job types a volume label can also be created at this step. This is the label that will appear when this disc is inserted into a computer drive.
When you have selected the data you would like to burn click the next button.
Step 2: Add Print
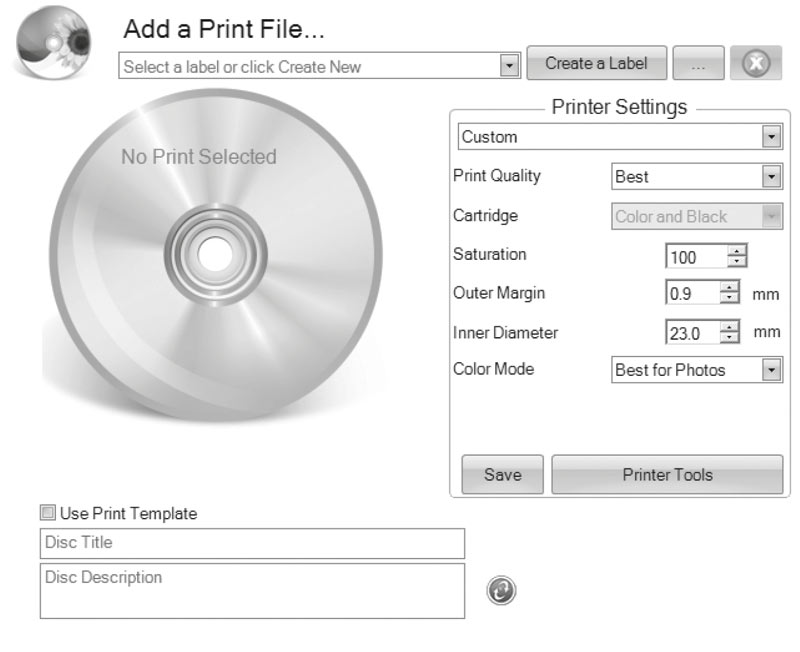
If you want something printed on your disc, this is where you choose an existing label or create it. Follow these steps.
To Select an exiting label:
- Click the browse button
 to open a browse window or drag and drop files to the print file box or click the drop down arrow to choose previously used labels.
 - Choose any supported file types of JPG, BMP, TIFF, SureThing (PC), or Disc Cover (Mac). Files should be 120mm (4.72") square. For best print quality the image resolution should be at least 300 dpi. Non-conforming files will be stretched or increased in size to fill the full size of the disc.
- Once the print file is selected a preview will be displayed.
- At this point you may choose to move on to the next step by clicking the next arrow. However, there are print quality and print area settings that you may want to adjust.
- Several preset media types that correspond with the media available at our webstore can be selected from the Media drop down box. When you select a media type from this box the Print Quality, Outer Margin and Inner Diameter are automatically adjusted to fit that media.
- To manually set these settings simply edit them. The media type will automatically change to Custom. You can save your adjusted settings by typing the name of the profile and clicking Save. This name and the associated settings will now be available to choose in the media drop down box.
Below is a description of each of the available settings.
- Quality. There are several choices here that correspond to the speed of the print and the saturation of the image. Higher quality = slower print speed and more vibrant and crisp prints.
- Outer Margin. Discs from other manufacturers vary widely regarding how far the printable surface extends to the edge of the disc. Measure the distance from the edge of the disc to the start of the white printable area. This will be between 0 and 2 mm in increments of 0.1mm.
- Inner Diameter. Discs from other manufacturers vary widely regarding how far the printable surface extends to the inside of the disc. Measure the distance from one side of the inner unprintable center hub to the other. This will be between 15 mm and 50 mm displayed in increments of 0.1mm.
To Create a new label:
- Click the Create Label button.
- The label design application SureThing (PC) or Swift Publisher (Mac) will open.
Design your label using the included backgrounds and clipart. You may also add your own image. Add text and any other design features. - Save your label by going to the File menu - Save as.
- Close SureThing or Swift Publisher.
- You will be asked if you would like to use the label you just created in your current project. Click Yes.
- You may now choose to adjust print settings as described above.
Step 3: Start Project (Summary - Settings)
In this step you can verify data and print information and set the number of copies. Optionally you may choose to edit burn settings. However, the default settings are optimized to give you the best quality burn. Simply click “Go” to start the job.
Below is a summary of all available options:
Project Summary
This areas displays information about the data you have chosen, a thumbnail and file name of the print file you have chosen and picture and description of the Disc Publisher Robot you have chosen. If any of this information is incorrect, use the back arrow at the bottom of the screen to go back to the appropriate window to correct it.
- Change Robot. This is only available with multiple robots connected. Click it to change the robot to which this project will be sent.
- Drives. With multiple drive units connected you can choose to burn to both drives or only the top drive or only the bottom drive. This is useful if one of the drives is starting to wear out and is producing rejected discs. You can simply stop using that drive until you are able to replace it.
- Protect Video with PTProtect (PC Only). This is only available in the DVD Video and ISO image Project with purchase of PTProtect USB dongle. See the PTProtect Section 3B.6 for more information.
- Save Project. On a Mac, at the top of the summary window you can type the name of your job and then click save to save it anywhere on your computer. For PC, you can save a project at any time by opening the file menu and choosing Save Project.
A project file is a small file that holds the locations of files to be burned, the location of the print file to be printed, and any specific project settings such as burn speed and number of copies. Note: A saved project file does not include the data to be burned or the print file to be printed. If these files are moved or deleted, the project file will need to be edited to reflect these changes. - Schedule Project. Click this button to schedule this job to run daily weekly or monthy at a specific time. For more information on this topic see Section 3B.5.
Project Options
For any job type you can click on the Options button for additional options for that job. Below is a description of all Project Options. Not all options are available for all Project Types. If the options are not available for the chosen project type, they will be hidden. If you would like these settings to be the default for all projects of this type click "Save as Defaults".
- Recording Speed. Set the recording speed with this option. The fastest recording speed is determined by the lowest maximum speed of the blank media or the drive. For example: The "fastest" speed in a 20x max drive with 16x max media would burn at 16x. In many cases a slower speed should be selected to achieve the least number of rejected discs.
- Recording Type.
Track-at-Once. This is the default. For track at once, the laser is turned off after each track, which produces a two-second gap. The track-at-once feature, enables songs and data to be written at different intervals. The lead-in sectors that are written at the beginning of each session contain the location where additional data can be placed on the disc.
Disc-at-Once. If this option is checked, the lead-in, all the tracks and lead-out are written in same action. The laser is kept on for the entire session. - Closed-Finalized/Open. A closed disc means no additional data can be added. If the disc is left open additional data can be added in another session.
- File System. The file system is the method by which the files and folder are arranged on the burned disc. Joliet is best for most CD burning applications. UDF 1.02 is best for DVD burning. UDF 2.6 is used for Blu-ray. The recording engine can also add a bridge which effectively adds another file system to the disc. UDF1.02 with a Joliet bridge is the default.
Most of the differences between file system types relate to file name length and character restrictions and folder level depth. ISO is the most restrictive and oldest and UDF is the least restrictive newest file type. The complete list of specifications for each is several hundred pages. Macs and PCs can read both types.
If you would like to make your burned disc compatible with very old operating systems or other less popular operating systems use the ISO system. - Test Record. If this option is checked the recorder tests a disc for record ability before burning. The drive laser is set to read power and the entire surface is scanned for errors. This takes the same amount of time as recording. (DVD+R media cannot be tested) This option cannot be used in combination with normal recording or verify.
- Verify. If this option is checked, it compares the copy with the master bit for bit. If it finds a discrepancy it rejects the disc. Verify is an extremely high quality standard. If the disc is audio or video, the disc may still be playable and the errors may not be detectable by human eyes or ears. This operation may be useful to verify software installation discs where it is extremely important to have accurate copies of all installation files. Checking this option will double the time it takes to record each disc.
- Set Time and Date to Mastering Time. If this option is checked, all files on the disc will automatically be set to the current time and date.