1D. IDENTIFYING THE PARTS
Front Panel and Top
This illustration shows the DP-4102, its Control Panel, Buttons, LED indicator lights, Input and Output Bins and other components.
1Robotic Disc Transporter
2Ink Cartridge Carrier
3Output Bin
4Reject Area
5Control Panel Lock
6CD/DVD Recorders
7Front Cover
8Control Panel
9LED Status Light
10Power Button
11Ink Cartridge Button
12Input Bin
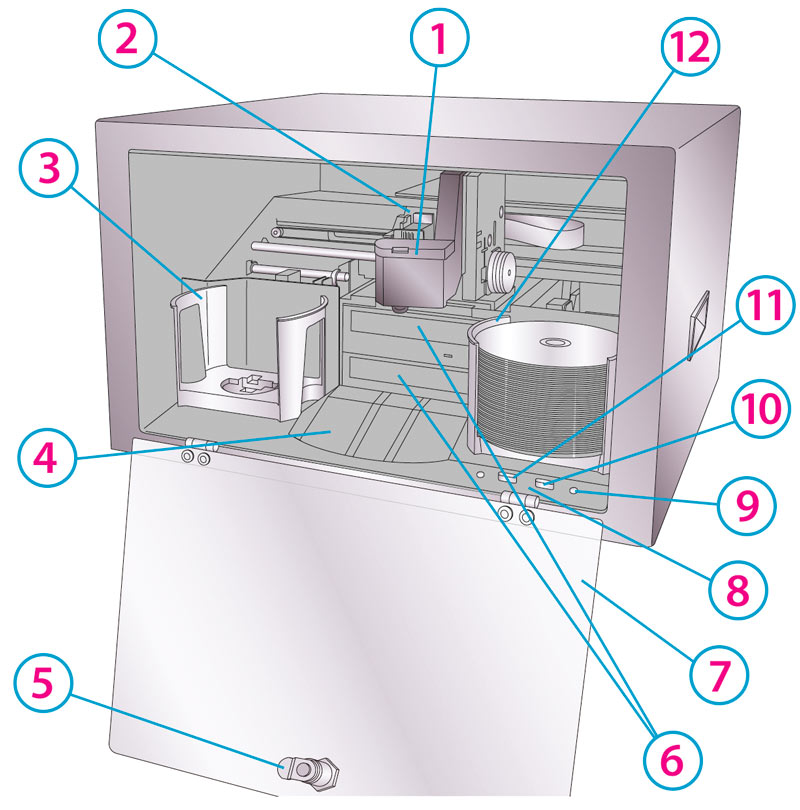
The Robotic Disc Transporter moves discs from the Input Bin, to a CD/DVD Recorder, to the printer, and finally to the Output Bin.
The CD/DVD Recorder is automatically loaded and unloaded by the Publisher's Robotic Disc Transporter.
The Recorder Tray Button manually opens or closes the Recorder Tray. In normal operation, the in/out movement of the Recorder Tray is controlled automatically and this button is not used.
The Control Panel contains LED Status Lights and Buttons to control the Publisher. The LED Status Lights indicate that Power is ON. They also blink in certain patterns to indicate an error or other condition of the Publisher. See Section 4 for a full explanation of the LED Status Light conditions.
The Power Button turns the Publisher's power ON and OFF.
When the front cover is opened, the Ink Cartridge Button is used to position the Ink Cartridge Carrier for easy ink cartridge replacement. When the front cover is closed, pressing the Ink Cartridge button will open or close the Printer Tray.
The Input/Output Bins are situated under the top cover of the Publisher. The bins will hold up to 50 discs. The right-side bin is the Input Bin for blank media; the left-side bin is the Output Bin for finished discs.
The Reject Area is where discs are dropped if they do not pass a software verification test. The discs slide down the ramp out in front of your Publisher.
The Front Cover is a durable plastic cover that will protect the Publisher from dust and interference.
The Ink Cartridge Carrier holds the CMY cartridge.
Rear Panel
This illustration shows the input ports and the power switch found on the rear panel of the Publisher:
The USB 3.0 Port is connected to an open USB 3.0 or 2.0 port on your PC with the USB 3.0 cable, included with your Publisher.
1Power Switch
2USB Port
3Power Input Port

The USB 3.0 Port is connected to an open USB 3.0 or 2.0 port on your PC with the USB 3.0 cable, included with your Publisher.
Note: For maximum speeds during Blu-ray burning, your computer should have a USB 3.0 port.
The Power Input Port connects to the included power cable. The internal power supply is auto-switching in the range of 100-240v.
The Power Switch shuts off all power to the Publisher.
The eSata ports are only visible on Blu-ray units. You will need to connect an eSATA cable to both of the eSATA ports.