Section 6: Troubleshooting, Maintenance and Other Settings
6.1 Troubleshooting
Multiple labels feed from the Application Arm, with or without platform movement.
Calibrate the label sensor. (See Section 3.4.)
Display flashes "SC-" when I try to apply a label.
Calibrate the label sensor. (See Section 3.4.)
Labels are applied to the container crooked.
- Check for container taper. Some containers may have a slight taper that will cause the label to be applied crooked. Make sure your container is oriented so the taper is from front-to-back or back-to- front, NOT side-to-side. You may also choose to install a wedge on one side or the other to make the container level from side-to-side.
- Roll Guides should also be positioned very close to the roll, but not squeezing any part of it (so the roll has very little, but at least some side-to-side play between the guides). For larger, heavier rolls make sure that the roll is positioned on top of the Roll Guides with the magnetic portions facing in. This will minimize the chances that the heavy roll will push the guides out of place.
- Make sure the Roll Drag Arm is in place as described in Section 2.1.4.
- Make sure the label stock runs parallel to the Application Arm. (See Section 2.1.12.)
Label position on container varies, side to side, from container to container.
Make sure the label stock is running parallel to the Application Arm (See Section 2.1.12.) and the Roll Guides
and Guide Collars are close to, but not pinching the label stock. Make sure the thumb screw holding the
Container Guide in place is tight. Also, be sure to hold the container tight to the guide until labeling
begins.
Label position on container varies, top-to-bottom, from container to container.
Lower the Application Arm height. (See Section 2.2.) Change the Application Roller Position and/or the
label distance from the peel edge. (See Section 3.3 & 3.5.) The optimal roller/label position is determined by
the angle of the arm during application and the various properties of a particular label/container
combination. Experimentation may be necessary.
Leading edge of labels fold as they are applied to the container.
Decrease the label distance from the peel edge. Some thin polyester and polypropylene label materials do
not have enough stiffness and can droop down from the peel edge if the label position is set too high. This
can cause folding at the leading edge of the label. (See Section
3.3 & 3.5.)
There are bubbles or wrinkles in the label.
Wrinkles or bubbles can appear on the applied label if the container is not smooth or has bumps or ridges.
To minimize bubbling or wrinkling, adjust the Application Roller position and/or the Label Position. (See
Section 3.5.)
Container Platform is stalling, scraping, or squealing.
An Application Arm position that is too low or excess pressure on the Application Arm Push Bar can cause
the platform to stall. Roll Guides and/or Guide Collars that pinch the label stock can also contribute to
stalling. After checking and correcting these items, if the platform still stalls or if scraping or squealing is
detected, replace the Platform Bearing Plate. (See Section 6.2.)
6.2 Maintenance
Liner Rollers When not in use, leave the Liner Idler Roller in the unclamped position. This will minimize the possibility that permanent indentations will be made in the Liner Drive Roller. If any label jams occur, be sure to remove any labels and/or adhesive from both of these rollers.
Lubricating bearings Primera recommends oiling the four bearings associated with the Liner Drive Roller and Liner Idler Roller. Oil these four bearings once every 50,000 containers labeled. They should only be oiled after the first 50,000 containers as they are lubricated with a special grease at the factory. One drop of any machine oil or motor oil for each bearings should be adequate. This maintenance is optional but will increase the life of the applicators for heavy users who use the applicator for several hours each day.
Replacing the Platform Bearing Plates
The Platform Bearing Plates ride against the Platform Shafts and are subject to wear. They will likely last
from 100,000 containers to 1,000,000 containers depending on the weight of the containers used. As they
wear, eventually the front of the Container Platform will ride low enough to scrape against the Base Plate.
At that point, the parts would need to be replaced. They are mounted by two screws that can be accessed
with the platform extended.
Platform Bearing Plate: Primera Part # 691306
6.3 Other Settings
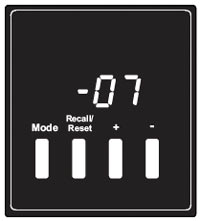
Setting the LED display intensity
- Press and hold the Mode and + button until the display shows “LEd”.
- Then press the + or – buttons to adjust the LED intensity.
- Press the Mode button to accept.
Moving tray to "out" position Press and hold the Recall/Reset and – button simultaneously. The tray will move to the "out" position.
Setting English or metric units
- Turn off the unit.
- Press and hold the Mode button and the + button simultaneously while switching on the unit.
English
Upon start up, the first digit will display as a "–" followed by the current firmware version.
English
- Turn off the unit.
- Press and hold the Mode button and the – button simultaneously while switching on the unit.
Metric
Upon start up, the first digit will display the upper and lower segment followed by the current firmware version.

Metric
Test Mode
- Turn off the unit.
- Press and hold the Recall/Reset and + button while switching on the unit.
- The unit will now move the platform in and out and run the liner drive roller continuously.
Note: Be sure to unload any label stock from the Liner Drive Roller before starting the Test Mode
Turning Test Mode off
- Turn off the unit.
- Press and hold the Recall/Reset and – button while switching on the unit. Test Mode will be disabled.
6.4 Control Panel Functions
Mode Button: Toggles the display between the label count and the current memory location. Hold for two seconds to enter the Setup Mode for the currently displayed memory location. Press to exit the Setup Mode.
Recall/Reset Button: Displays next memory location in Memory Mode. Indexes to the next parameter in Setup Mode. Hold for two seconds to reset the label counter when in Label Count Mode. Hold for two seconds to clear all the settings for the current memory location.
+ Button: Increments the current parameter when in Setup Mode. Hold to advance more quickly. When the label count is displayed, hold for two seconds to increase the count.
– Button: Decrements the current parameter when in Setup Mode. Hold to advance more quickly. When the label count is displayed, hold for two seconds to decrease the count.